AdSense

AdSense3

Monday 30 June 2014

JAVA ARRAYS


Java provides a data structure, the array, which stores a fixed-size sequential collection of elements of the same type. An array is used to store a collection of data, but it is often more useful to think of an array as a collection of variables of the same type.
Instead of declaring individual variables, such as number0, number1, ..., and number99, you declare one array variable such as numbers and use numbers[0], numbers[1], and ..., numbers[99] to represent individual variables.
This tutorial introduces how to declare array variables, create arrays, and process arrays using indexed variables.

Declaring Array Variables:

To use an array in a program, you must declare a variable to reference the array, and you must specify the type of array the variable can reference. Here is the syntax for declaring an array variable:
dataType[] arrayRefVar;   // preferred way.

or

dataType arrayRefVar[];  //  works but not preferred way.
Note: The style dataType[] arrayRefVar is preferred. The style dataType arrayRefVar[] comes from the C/C++ language and was adopted in Java to accommodate C/C++ programmers.

Example:

The following code snippets are examples of this syntax:
double[] myList;         // preferred way.

or

double myList[];         //  works but not preferred way.

Creating Arrays:

You can create an array by using the new operator with the following syntax:
arrayRefVar = new dataType[arraySize];
The above statement does two things:
  • It creates an array using new dataType[arraySize];
  • It assigns the reference of the newly created array to the variable arrayRefVar.
Declaring an array variable, creating an array, and assigning the reference of the array to the variable can be combined in one statement, as shown below:
dataType[] arrayRefVar = new dataType[arraySize];
Alternatively you can create arrays as follows:
dataType[] arrayRefVar = {value0, value1, ..., valuek};
The array elements are accessed through the index. Array indices are 0-based; that is, they start from 0 to arrayRefVar.length-1.

Example:

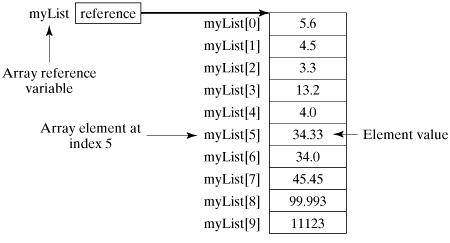
Following statement declares an array variable, myList, creates an array of 10 elements of double type and assigns its reference to myList:
double[] myList = new double[10];
Following picture represents array myList. Here, myList holds ten double values and the indices are from 0 to 9.
Java Array

Processing Arrays:

When processing array elements, we often use either for loop or foreach loop because all of the elements in an array are of the same type and the size of the array is known.

Example:

Here is a complete example of showing how to create, initialize and process arrays:
public class TestArray {

   public static void main(String[] args) {
      double[] myList = {1.9, 2.9, 3.4, 3.5};

      // Print all the array elements
      for (int i = 0; i < myList.length; i++) {
         System.out.println(myList[i] + " ");
      }
      // Summing all elements
      double total = 0;
      for (int i = 0; i < myList.length; i++) {
         total += myList[i];
      }
      System.out.println("Total is " + total);
      // Finding the largest element
      double max = myList[0];
      for (int i = 1; i < myList.length; i++) {
         if (myList[i] > max) max = myList[i];
      }
      System.out.println("Max is " + max);
   }
}
This would produce the following result:
1.9
2.9
3.4
3.5
Total is 11.7
Max is 3.5

The foreach Loops:

JDK 1.5 introduced a new for loop known as foreach loop or enhanced for loop, which enables you to traverse the complete array sequentially without using an index variable.

Example:

The following code displays all the elements in the array myList:
public class TestArray {

   public static void main(String[] args) {
      double[] myList = {1.9, 2.9, 3.4, 3.5};

      // Print all the array elements
      for (double element: myList) {
         System.out.println(element);
      }
   }
}
This would produce the following result:
1.9
2.9
3.4
3.5

Passing Arrays to Methods:

Just as you can pass primitive type values to methods, you can also pass arrays to methods. For example, the following method displays the elements in an int array:
public static void printArray(int[] array) {
  for (int i = 0; i < array.length; i++) {
    System.out.print(array[i] + " ");
  }
}
You can invoke it by passing an array. For example, the following statement invokes the printArray method to display 3, 1, 2, 6, 4, and 2:
printArray(new int[]{3, 1, 2, 6, 4, 2});

Returning an Array from a Method:

A method may also return an array. For example, the method shown below returns an array that is the reversal of another array:
public static int[] reverse(int[] list) {
  int[] result = new int[list.length];

  for (int i = 0, j = result.length - 1; i < list.length; i++, j--) {
    result[j] = list[i];
  }
  return result;
}

The Arrays Class:

The java.util.Arrays class contains various static methods for sorting and searching arrays, comparing arrays, and filling array elements. These methods are overloaded for all primitive types.
SNMethods with Description
1public static int binarySearch(Object[] a, Object key)
Searches the specified array of Object ( Byte, Int , double, etc.) for the specified value using the binary search algorithm. The array must be sorted prior to making this call. This returns index of the search key, if it is contained in the list; otherwise, (-(insertion point + 1).
2public static boolean equals(long[] a, long[] a2)
Returns true if the two specified arrays of longs are equal to one another. Two arrays are considered equal if both arrays contain the same number of elements, and all corresponding pairs of elements in the two arrays are equal. This returns true if the two arrays are equal. Same method could be used by all other primitive data types (Byte, short, Int, etc.)
3public static void fill(int[] a, int val)
Assigns the specified int value to each element of the specified array of ints. Same method could be used by all other primitive data types (Byte, short, Int etc.)
4public static void sort(Object[] a)
Sorts the specified array of objects into ascending order, according to the natural ordering of its elements. Same method could be used by all other primitive data types ( Byte, short, Int, etc.)

Sunday 29 June 2014

JAVA STRINGS


Saturday 28 June 2014

JAVA NUMBERS


Normally, when we work with Numbers, we use primitive data types such as byte, int, long, double, etc.

Example:

int i = 5000;
float gpa = 13.65;
byte mask = 0xaf;
However, in development, we come across situations where we need to use objects instead of primitive data types. In-order to achieve this Java provides wrapper classes for each primitive data type.
All the wrapper classes (Integer, Long, Byte, Double, Float, Short) are subclasses of the abstract class Number.
Number Subclasses
This wrapping is taken care of by the compiler, the process is called boxing. So when a primitive is used when an object is required, the compiler boxes the primitive type in its wrapper class. Similarly, the compiler unboxes the object to a primitive as well. The Number is part of the java.lang package.
Here is an example of boxing and unboxing:
public class Test{

   public static void main(String args[]){
      Integer x = 5; // boxes int to an Integer object
      x =  x + 10;   // unboxes the Integer to a int
      System.out.println(x); 
   }
}
This would produce the following result:
15
When x is assigned integer values, the compiler boxes the integer because x is integer objects. Later, x is unboxed so that they can be added as integers.

Number Methods:

Here is the list of the instance methods that all the subclasses of the Number class implement:
SNMethods with Description
1xxxValue()
Converts the value of this Number object to the xxx data type and returned it.
2compareTo()
Compares this Number object to the argument.
3equals()
Determines whether this number object is equal to the argument.
4valueOf()
Returns an Integer object holding the value of the specified primitive.
5toString()
Returns a String object representing the value of specified int or Integer.
6parseInt()
This method is used to get the primitive data type of a certain String.
7abs()
Returns the absolute value of the argument.
8ceil()
Returns the smallest integer that is greater than or equal to the argument. Returned as a double.
9floor()
Returns the largest integer that is less than or equal to the argument. Returned as a double.
10rint()
Returns the integer that is closest in value to the argument. Returned as a double.
11round()
Returns the closest long or int, as indicated by the method's return type, to the argument.
12min()
Returns the smaller of the two arguments.
13max()
Returns the larger of the two arguments.
14exp()
Returns the base of the natural logarithms, e, to the power of the argument.
15log()
Returns the natural logarithm of the argument.
16pow()
Returns the value of the first argument raised to the power of the second argument.
17sqrt()
Returns the square root of the argument.
18sin()
Returns the sine of the specified double value.
19cos()
Returns the cosine of the specified double value.
20tan()
Returns the tangent of the specified double value.
21asin()
Returns the arcsine of the specified double value.
22acos()
Returns the arccosine of the specified double value.
23atan()
Returns the arctangent of the specified double value.
24atan2()
Converts rectangular coordinates (x, y) to polar coordinate (r, theta) and returns theta.
25toDegrees()
Converts the argument to degrees
26toRadians()
Converts the argument to radians.
27random()
Returns a random number.

Friday 27 June 2014

JAVA DECISION MAKING

There are two types of decision making statements in Java. They are:
  • if statements
  • switch statements

The if Statement:

An if statement consists of a Boolean expression followed by one or more statements.

Syntax:

The syntax of an if statement is:
if(Boolean_expression)
{
   //Statements will execute if the Boolean expression is true
}
If the Boolean expression evaluates to true then the block of code inside the if statement will be executed. If not the first set of code after the end of the if statement (after the closing curly brace) will be executed.

Example:

public class Test {

   public static void main(String args[]){
      int x = 10;

      if( x < 20 ){
         System.out.print("This is if statement");
      }
   }
}
This would produce the following result:
This is if statement

The if...else Statement:

An if statement can be followed by an optional else statement, which executes when the Boolean expression is false.

Syntax:

The syntax of an if...else is:
if(Boolean_expression){
   //Executes when the Boolean expression is true
}else{
   //Executes when the Boolean expression is false
}

Example:

public class Test {

   public static void main(String args[]){
      int x = 30;

      if( x < 20 ){
         System.out.print("This is if statement");
      }else{
         System.out.print("This is else statement");
      }
   }
}
This would produce the following result:
This is else statement

The if...else if...else Statement:

An if statement can be followed by an optional else if...else statement, which is very useful to test various conditions using single if...else if statement.
When using if , else if , else statements there are few points to keep in mind.
  • An if can have zero or one else's and it must come after any else if's.
  • An if can have zero to many else if's and they must come before the else.
  • Once an else if succeeds, none of the remaining else if's or else's will be tested.

Syntax:

The syntax of an if...else is:
if(Boolean_expression 1){
   //Executes when the Boolean expression 1 is true
}else if(Boolean_expression 2){
   //Executes when the Boolean expression 2 is true
}else if(Boolean_expression 3){
   //Executes when the Boolean expression 3 is true
}else {
   //Executes when the none of the above condition is true.
}

Example:

public class Test {

   public static void main(String args[]){
      int x = 30;

      if( x == 10 ){
         System.out.print("Value of X is 10");
      }else if( x == 20 ){
         System.out.print("Value of X is 20");
      }else if( x == 30 ){
         System.out.print("Value of X is 30");
      }else{
         System.out.print("This is else statement");
      }
   }
}
This would produce the following result:
Value of X is 30

Nested if...else Statement:

It is always legal to nest if-else statements which means you can use one if or else if statement inside another if or else if statement.

Syntax:

The syntax for a nested if...else is as follows:
if(Boolean_expression 1){
   //Executes when the Boolean expression 1 is true
   if(Boolean_expression 2){
      //Executes when the Boolean expression 2 is true
   }
}
You can nest else if...else in the similar way as we have nested if statement.

Example:

public class Test {

   public static void main(String args[]){
      int x = 30;
      int y = 10;

      if( x == 30 ){
         if( y == 10 ){
             System.out.print("X = 30 and Y = 10");
          }
       }
    }
}
This would produce the following result:
X = 30 and Y = 10

The switch Statement:

switch statement allows a variable to be tested for equality against a list of values. Each value is called a case, and the variable being switched on is checked for each case.

Syntax:

The syntax of enhanced for loop is:
switch(expression){
    case value :
       //Statements
       break; //optional
    case value :
       //Statements
       break; //optional
    //You can have any number of case statements.
    default : //Optional
       //Statements
}
The following rules apply to a switch statement:
  • The variable used in a switch statement can only be a byte, short, int, or char.
  • You can have any number of case statements within a switch. Each case is followed by the value to be compared to and a colon.
  • The value for a case must be the same data type as the variable in the switch and it must be a constant or a literal.
  • When the variable being switched on is equal to a case, the statements following that case will execute until a break statement is reached.
  • When a break statement is reached, the switch terminates, and the flow of control jumps to the next line following the switch statement.
  • Not every case needs to contain a break. If no break appears, the flow of control will fall through to subsequent cases until a break is reached.
  • switch statement can have an optional default case, which must appear at the end of the switch. The default case can be used for performing a task when none of the cases is true. No break is needed in the default case.

Example:

public class Test {

   public static void main(String args[]){
      //char grade = args[0].charAt(0);
      char grade = 'C';

      switch(grade)
      {
         case 'A' :
            System.out.println("Excellent!"); 
            break;
         case 'B' :
         case 'C' :
            System.out.println("Well done");
            break;
         case 'D' :
            System.out.println("You passed");
         case 'F' :
            System.out.println("Better try again");
            break;
         default :
            System.out.println("Invalid grade");
      }
      System.out.println("Your grade is " + grade);
   }
}
Compile and run above program using various command line arguments. This would produce the following result:
$ java Test
Well done
Your grade is a C
$