Q.1 Explain in brief about the important file and folder when you create new android application.
When you create android application the following folders are created in the package explorer in eclipse which are as follows:
src: Contains the .java source files for your project. You write the code for your application in this file. This file is available under the package name for your project.
gen —This folder contains the R.java file. It is compiler-generated file that references all the resources found in your project. You should not modify this file.
Android 4.0 library: This folder contains android.jar file, which contains all the class libraries needed for an Android application.
assets: This folder contains all the information about HTML file, text files, databases, etc.
bin: It contains the .apk file (Android Package) that is generated by the ADT during the build process. An .apk file is the application binary file. It contains everything needed to run an Android application.
res: This folder contains all the resource file that is used byandroid application. It contains subfolders as: drawable, menu, layout, and values etc.
Explain AndroidManifest.xmlfile in detail.
<?xml version="1.0" encoding="utf-8"?>
<manifest xmlns:android="http://schemas.android.com/apk/res/android" package="com.example.careerride" android:versionCode="1" android:versionName="1.0">
<uses-sdk android:minSdkVersion="8" android:targetSdkVersion="18" />
<application android:allowBackup="true" android:icon="@drawable/ic_launcher" android:label="@string/app_name" android:theme="@style/AppTheme">
<activity android:name="com.example.careerride.MainActivity" android:label="@string/app_name">
<intent-filter>
<action android:name="android.intent.action.MAIN" />
<category android:name="android.intent.category.LAUNCHER" />
</intent-filter>
</activity>
</application>
</manifest>
The AndroidManifest.xml file contains the following information about the application:
- It contains the package name of the application.
- The version code of the application is 1.This value is used to identify the version number of your application.
- The version name of the application is 1.0
- The android:minSdkVersion attribute of the element defines the minimum version of the OS on which the application will run.
- ic_launcher.png is the default image that located in the drawable folders.
- app_name defines the name of applicationand available in the strings.xml file.
- It also contains the information about the activity. Its name is same as the application name.
Describe android Activities in brief.
Activity provides the user interface. When you create an android application in eclipse through the wizard it asks you the name of the activity. Default name is MainActivity. You can provide any name according to the need. Basically it is a class (MainActivity) that is inherited automatically from Activity class. Mostly, applications have oneor more activities; and the main purpose of an activity is to interact with the user. Activity goes through a numberof stages, known as an activity’s life cycle.
Example:
packagecom.example.careerride; //Application name careerride
importandroid.os.Bundle; // Default packages
importandroid.app.Activity; // Default packages
importandroid.view.Menu;
public class MainActivity extends Activity {
@Override
protected void onCreate(Bundle savedInstanceState) {
super.onCreate(savedInstanceState);
setContentView(R.layout.activity_main);
}
@Override
publicbooleanonCreateOptionsMenu(Menu menu) {
// Inflate the menu; this adds items to the action bar if it is present.
getMenuInflater().inflate(R.menu.main, menu);
return true;
}
}
When you run the application onCreate method is called automatically.
Describe Intents in detail.
An Android application can contain zero or more activities. If you want to navigate fromone activity to another then android provides you Intent class. This class is available inandroid.content.Intent package.One of the most common uses for Intents is to start new activities.
There are two types of Intents.
Explicit Intents
Implicit Intents
Intents works in pairs: actionand data. The action defines what you want to do, such as editing an item, viewingthe content of an item etc. The dataspecifies what is affected,such as a person in the Contacts database. The data is specified as anUri object.
Explicitly starting an Activity
Intent intent = newIntent (this, SecondActivity.class);
startActivity(intent);
Here SecondActivity is the name of the target activity that you want to start.
Implicitly starting an Activity
If you want to view a web page with the specified URL then you can use this procedure.
Intent i = newIntent(android.content.Intent.ACTION_VIEW,Uri.parse(“http://www.amazon.com”));
startActivity(i);
if you want to dial a telephone number then you can use this method by passing the telephone number in the data portion
Intent i = newIntent (android.content.Intent.ACTION_DIAL,Uri.parse(“tel:+9923.....”));
startActivity(i);
In the above method the user must press the dial button to dial the number. If you want to directly call the number without user intervention, change the action as follows:
Intent i = newIntent (android.content.Intent.ACTION_CALL,Uri.parse(“tel:+9923.....”));
startActivity(i);
If you want to dial tel no or use internet then write these line in AndroidManifest.xml
<uses-permissionandroid:name=”android.permission.CALL_PHONE”/>
<uses-permissionandroid:name=”android.permission.INTERNET”/>
How to send SMS in android? Explain with example.
SMS messaging is one of the basic and important applications on a mobile phone. Now days every mobile phone has SMS messaging capabilities, and nearly all users of any age know how to send and receive suchmessages. Mobile phones come with a built-in SMS application that enables you to send and receiveSMS messages. If you want to send the SMS programmatically then follow the following steps.
Sending SMS Messages Programmatically
Take a button on activity_main.xml file as follows.
<Button android:id="@+id/btnSendSMS" android:layout_width="wrap_content" android:layout_height="wrap_content" android:layout_centerHorizontal="true" android:layout_centerVertical="true" android:onClick=”sendmySMS” android:text="sendSMS" />
According to above code when user clicks the button sendmySMS method will be called. sendmySMS is user defined method.
In the AndroidManifest.xml file, add the following statements
<uses-permissionandroid:name=”android.permission.SEND_SMS”/>
Now we write the final step. Write the given below method in MainActivity,java file
publicvoidsendmySMS(View v)
{
SmsManagersms = SmsManager.getDefault();
sms.sendTextMessage("5556", null, "Hello from careerRide", null, null);
}
In this example I have used two emulator. On the first Android emulator (5554), click the Send SMSbutton to send an SMS message to the second emulator(5556).
Describe the SmsManager class in android.
SmsManager class is responsible for sending SMS from one emulator to another or device.
You cannot directly instantiate this class; instead, you call the getDefault() static method to obtain an SmsManager object. You then send the SMS message using the sendTextMessage() method:
SmsManagersms = SmsManager.getDefault();
sms.sendTextMessage("5556", null, "Hello from careerRide", null, null);
sendTextMessage() method takes five argument.
- destinationAddress — Phone number of the recipient.
- scAddress — Service center address; you can use null also.
- text — Content of the SMS message that you want to send.
- sentIntent — Pending intent to invoke when the message is sent.
- deliveryIntent — Pending intent to invoke when the message has been delivered.
How you can use built-in Messaging within your application?
You can use an Intent object to activate the built-in Messaging service. You have to pass MIME type “vnd.android-dir/mms-sms”, in setType method of Intent as shown in the following given below code.
Intent intent = new Intent (android.content.Intent.ACTION_VIEW);
intent.putExtra("address", "5556; 5558;");// Send the message to multiple recipient.
itent.putExtra("sms_body", "Hello my friends!");
intent.setType("vnd.android-dir/mms-sms");
startActivity(intent);
What are different data storage options are available in Android?
Different data storage options are available in Android are:
- SharedPreferences
- SQlite
- ContentProvider
- File Storage
- Cloud Storage
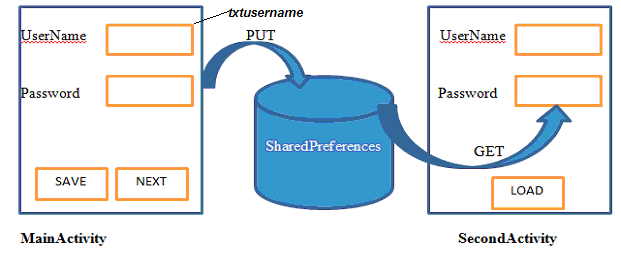
Describe SharedPreference storage option with example.
SharedPreference is the simplest mechanism to store the data in android. You do not worry about creating the file or using files API.It stores the data in XML files. SharedPreference stores the data in key value pair.The SharedPreferences class allows you to save and retrieve key-value pairs of primitive data types. You can use SharedPreferences to save any primitive data: boolean, floats, int, longs, and strings.The data is stored in XML file in the directory data/data//shared-prefs folder.
Application of SharedPreference
- Storing the information about number of visitors (counter).
- Storing the date and time (when your Application is updated).
- Storing the username and password.
- Storing the user settings.
Example:
For storing the data we will write the following code in main activity on save button:
SharedPreferences sf=getSharedPreferences("MyData", MODE_PRIVATE);
SharedPreferences.Editored= sf.edit();
ed.putString("name", txtusername.getText().toString());
ed.putString("pass", txtpassword.getText().toString());
ed.commit();
In this example I have taken two activities. The first is MainActivity and the second one is SecondActivity.When user click on save button the user name and password that you have entered in textboxes, will be stored in MyData.xml file.
Here MyData is the name of XML file .It will be created automatically for you.
MODE_PRIVATE means this file is used by your application only.
txtusernameand txtpassword are two EditText control in MainActivity.
For retrieving the data we will write the following code in SecondActiviy when user click on Load button:
Public static final String DEFAULT=”N? A”;
DEFAULT is a String type user defined global variable.If the data is not saved in XML file and user click on load button then your application will not give the error. It will show message “No Data is found”. Here name and pass are same variable that I have used in MainActivity.
SharedPreferences sf=getSharedPreferences("MyData", Context.MODE_PRIVATE);
String Uname=sf.getString("name", DEFAULT);
String UPass=sf.getString("pass", DEFAULT);
if(name.equals(DEFAULT)||Pass.equals(DEFAULT))
{
Toast.makeText(this, "No data is found", Toast.LENGTH_LONG).show();
}
else
{
Txtusername.setText(Uname);
Txtpassword.setText(UPass) ;
}
No comments:
Post a Comment